| 
General Overview of the SchuurSpeed Extreme SPEC Electronic Speed Control (ESC):
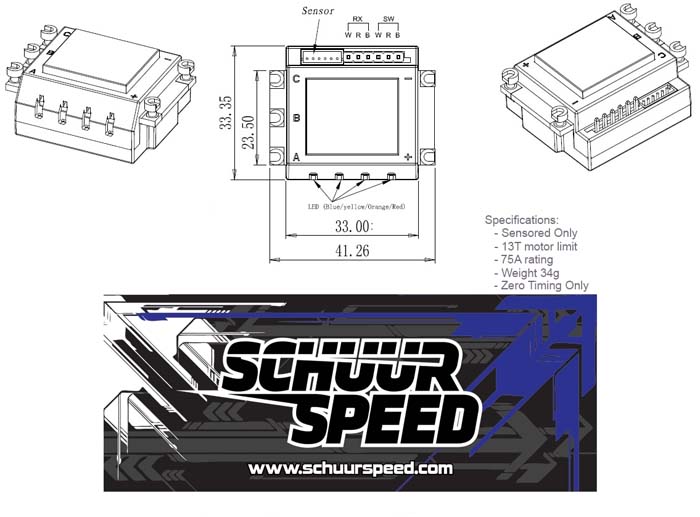
This ESC is ONLY for use with brushless motors, with the lowest wind designation of 13.5T sensored operation. It will operate 13.5T, 17.5T, 21.5T, and 25.5T brushless motors that are commonly used in SPEC Class racing today. This ESC will ONLY support a 2-Cell or 2S LiPo battery of 7.4 volts..
NOTE: Use of a lower than 13.5T Sensored Motor voids any and all warranty. Use of any battery others than a 2S LiPo battery which is 7.4V will also void any and all warranty.
The principle idea behind this ESC was to develop an ESC for SPEC racing in a pure blinky/non-timing mode. This ESC offers no timing adjustability. With this in mind to help a SPEC racer we&rsquove introduced FREQUENCY into the settings equation.
There is the normal drag brake and brake strength settings, which can be further enhanced through the manipulation of the frequency. The lower the brake or drag brake frequency is set, the more aggressive the braking feels. Raising the frequency lessens this aggressiveness. This results in several methods of setting up drag brake or brakes to suite your specific feel.
Throttle control has a Power function, which is discussed below, as well as the addition of drive frequency. Using a lower frequency setting results in more low end power response which also brings more heat potential. Use of a high frequency lessens the low end power, lowers heat potential, and is a smoother feel when driving.
For example, running an off road buggy on a higher bite clay surface, you may like a lower frequency for throttle combined with lower frequencies on your braking, since the track will have ample traction.
Using the same off road buggy running on a loose or loamy track you would raise the frequency making the buggy smoother under throttle. For braking you would also raise the frequencies to limit aggressive brake feel, helping the buggy to not brake loose.
In general the lower the frequency the more aggressive the feel, and raising the frequency will lessen that feel. Adjusting the frequency in combination with the amount of braking or drag brake will allow you to completely control the feel. For example, you can create strong braking in 2 methods, first by using 100 brake and a High Frequency, secondly by running 75 brake and use a low frequency setting. Each driver will need to try the different combinations to find their feel.
Electronic Speed Control (ESC) Functions:
Operation Mode: There are 3 combinations of options for Forward / Brake / Reverse. The most commonly used for racing is Forward/Brake since reverse is not allowed when racing. Please note that there is a delay built into the software to delay entry into reverse. The delay is to prevent for example going from full throttle directly into reverse, which is hard not only on the esc but motor and battery.
Reverse Speed: Here you can set the percentage of throttle for reverse. DEFAULT is 25
Low Voltage Threshold: Select the value you desire for Low Voltage Cutoff (LVC) which activates when your battery under load drops to this preset value. The DEFAULT is 3.2V per cell and provides safe operation. If the LVC activates while running you will notice the RED LED blinking.
Drag Brake: Select the percent of Drag Brake desired. This is also referred to by some as Neutral Brake. Using to much will increase the motor temperature during racing. DEFAULT is 10
Initial Brake: Select the amount of braking action when you begin to PUSH on the brake control. DEFAULT is =Drag Brake. You can select strong values but do not recommend selecting a lower value than the Drag Brake setting.
Drag Frequency: Mentioned above use these values to fine tuning the Drag Brake "feel". DEFAULT is 8Khz
Full Brake: Select the percentage of FULL brake. DEFAULT is 80
Brake Frequency: Mentioned above use these values to fine tune the Braking "feel" Default is 4Khz
Power Profile: Select the value that provides you the appropriate level of punch. The higher numerical selection the better your batteries must be. On high traction a starting point is 7 to 9, for a low traction surface start at 5 to 7. On very high traction setting to 9 may actually increase motor temperature by providing the motor more volt/amp than can be used, and by lowering to 8 will result in the same punch feel but a cooler motor. DEFAULT is Level 7
Drive Frequency: Mentioned above you can fine tune the actual &ldquofeel&rdquo of the throttle. Lower the Frequency the more bottom end and with a higher frequency the smooth the operation. Lower = more heat, and Higher = less heat. DEFAULT is 8Khz
Neutral DeadBand: Amount of movement in percentage before throttle or braking activates. Default is 6 and is recommended for 95 of radio systems in use today.
Temperature Set: This is the internal temperature the ESC will cut back throttle in an attempt to cool the esc prior to shutting down. DEFAULT is 176F / 80C
Radio / Transmitter Calibration:
Before proceeding it is strongly recommended that you set both your brake EPA (End Point Adjustment) and throttle EPA to 100. The new breed of ESC&rsquos do not like more electronic throw. You can adjust the throttle throw in other ways through the transmitter is most common using the curve. Similarly braking can best be adjusted through the ESC. As a general rule start at 100 EPA and if you find you need to reduce the EPA below 90 then you should consider making the ESC do more work and lessen the braking strength at the ESC, resetting the EPA back to 100.
Install and connect the ESC into your car, buggy, or truck, connecting the A, B and C motor leads and the sensor wire. Insert the connector into channel 2 of your receiver (noting - + s). Now you are ready to connect to your 2S battery.
Notice the small button on the ON-OFF switch. This button is used during the setup process only.
1. Hold the small button down and at the same time turn the ESC ON. Wait until the ORANGE LED is on solid.
2. With the transmitter in neutral position, press the small button for just a moment.
3. The LED should now be solid GREEN. Pull full throttle and press the small button for just a moment
4. The LED should now be solid RED. Press full brake and press the small button again for a moment.
5. Wait a few seconds and the GREEN LED will come on solid along with a Blinking BLUE LED. Turn off the ESC to SAVE your calibration settings.
6. You are now ready to run.
Using the Programming Box:
The supplied Programming Box requires that the ESC be connected to your 2S 7.4V battery with the power switch turned off.
1. Unplug the lead from channel 2 of your receiver
2. Plug this lead into the Programming Box ? note marked polarity ( - + s ) using port closest to the edge of the box.
3. Turn on the ESC, you should see the programming box display SchuurSpeed and version information
From here notice the 4 buttons with arrows. When you see an (*) next to an option this indicates a DEFAULT setting.
The first button will move you through the ESC&rsquos parameters
The second button will scroll you through the options within the parameter
The third button will return you all the way back to the beginning of the parameters from any point
The fourth button confirms your selection and writes the option selected to the ESC.
4. After you make your changes to the settings you MUST turn off the ESC prior to disconnecting the receiver lead. If you happen to remove the lead first it would be recommended to reconnect to ensure your settings are as you wish.
5. Reinsert the lead back into receiver channel 2 noting polarity.
6. Your finished
Please submit any comments, suggestions or requests to support@schuurspeed.com. Thank you for being part of the controlled release group.
|
